Battery switch on travel trailer function is crucial for managing your RV’s power. Understanding how to use your battery switch safely and effectively is key to enjoying worry-free camping trips. This guide will walk you through the different types of switches, how to connect and disconnect your batteries, troubleshoot common problems, and even integrate solar power into your system.
Get ready to become a battery switch pro!
We’ll cover everything from basic operation to advanced techniques, ensuring you’re comfortable and confident managing your travel trailer’s electrical system. Whether you’re a seasoned RVer or a first-timer, this guide provides clear, step-by-step instructions and helpful tips to keep your batteries charged and your appliances running smoothly.
Understanding Battery Switch Functionality in Travel Trailers
Your travel trailer’s battery switch is a crucial component, managing power flow between your house batteries and external power sources. Understanding its operation is essential for safe and efficient RVing. This section will clarify the different types of switches, their operation, and help you choose the right one for your needs.
Types of Battery Switches
Travel trailers typically utilize one of three main types of battery switches: a simple on/off switch, a dual-battery switch, and a battery isolator. Each offers varying levels of control and protection.
Simple On/Off Switch
This is the most basic type. It simply connects or disconnects your house batteries from the trailer’s electrical system. It’s inexpensive but offers limited functionality. The main advantage is its simplicity; the disadvantage is the lack of control over charging and the inability to switch between battery banks.
Dual Battery Switch
This switch allows you to select between two battery banks (often a starting battery and a house battery). This gives you greater control, allowing you to isolate one battery while using the other, conserving power and preventing accidental drain. The advantages are improved battery management and increased flexibility. However, it still doesn’t offer automatic charging control.
Battery Isolator
A battery isolator is a more sophisticated device that automatically manages the charging of multiple batteries. It allows you to charge both your starting and house batteries simultaneously from your tow vehicle or shore power. The advantages include efficient charging and protection against over-discharge. However, it’s typically more expensive than simpler switches.
Operating a Typical Battery Switch
The specific operation will vary slightly depending on the brand and model, but the general principles remain the same. Always refer to your specific switch’s instruction manual for detailed instructions.
- Locate the switch: Usually found near the battery compartment or inside a dedicated electrical panel.
- Identify the positions: Most switches have clearly labeled positions (e.g., “Off,” “Battery 1,” “Battery 2,” “Both”).
- Select the desired position: Turn the switch to the appropriate position to connect or disconnect the batteries as needed.
- Verify functionality: Check your trailer’s electrical systems to ensure power is flowing as expected.
Battery Switch Brand Comparison
| Brand | Type | Key Features | Price Range (USD) |
|---|---|---|---|
| Blue Sea Systems | Various (On/Off, Dual, Isolator) | High quality, reliable, multiple configurations | $20 – $150 |
| Perko | Various (On/Off, Dual, Isolator) | Durable, marine-grade construction, long lifespan | $30 – $120 |
| AGS | Primarily Isolators | Automatic charging, efficient power management | $80 – $200 |
| Generic/OEM | Various | Widely available, often included with trailers, variable quality | $10 – $80 |
Connecting and Disconnecting Batteries: Battery Switch On Travel Trailer Function
Properly connecting and disconnecting your travel trailer’s batteries is crucial for safe and reliable operation. Understanding the process and taking necessary precautions will prevent damage to your electrical system and avoid potential hazards. This section details the procedures for both connecting to shore power and disconnecting your batteries.
Connecting to Shore Power with a Battery Switch
When connecting your travel trailer to shore power, the battery switch plays a vital role in managing power flow. First, ensure your shore power cord is securely connected to both the trailer and the power source. Then, depending on your battery switch’s configuration (typically a 3-position switch: Off, Battery, and Shore Power), move the switch to the “Shore Power” position.
This allows the shore power to supply electricity to your trailer’s systems, bypassing the batteries. This is generally the preferred method as it allows you to charge your batteries using the shore power’s converter while running the trailer’s appliances directly from the shore power. Never attempt to connect to shore power with the switch in the “Battery” position, as this can cause a dangerous short circuit.
Disconnecting Batteries from the Trailer’s Electrical System
To disconnect your batteries, you must first turn off all appliances and electrical devices within the trailer. Then, locate your battery switch and move it to the “Off” position. This completely isolates the batteries from the trailer’s electrical system, preventing accidental discharge or short circuits. This step is essential before performing any maintenance on the electrical system or disconnecting the batteries entirely from the trailer.
Safety Precautions When Working with Batteries and Battery Switches
Working with batteries and electrical systems requires caution. Always wear safety glasses to protect your eyes from potential splashes of battery acid. Use insulated tools to prevent electrical shocks. Never touch the battery terminals simultaneously, as this can cause a short circuit and potentially burn you. Ensure proper ventilation when working with batteries, as they release hydrogen gas which is flammable.
If you are unsure about any aspect of the process, consult a qualified electrician. Furthermore, always disconnect the negative (-) terminal first when disconnecting batteries and reconnect it last when connecting them. This minimizes the risk of accidental sparks.
Best Practices for Maintaining a Travel Trailer’s Battery System
Regular maintenance is key to extending the lifespan of your travel trailer’s batteries. Keep the battery terminals clean and free of corrosion using a wire brush and baking soda solution. Regularly check the electrolyte levels in flooded-cell batteries (if applicable) and add distilled water as needed. Avoid deep discharges whenever possible, as this significantly reduces battery lifespan.
Consider using a battery monitor to track your battery’s state of charge. Finally, store your batteries in a cool, dry place when not in use. For extended storage periods, consider using a trickle charger to maintain a sufficient charge level and prevent sulfation.
Troubleshooting Common Battery Switch Issues
So, your travel trailer’s battery switch isn’t cooperating? Don’t worry, it’s a fairly common problem. This section will guide you through identifying and fixing some of the most frequent issues. Understanding the basics of your battery system will make troubleshooting much easier.This section details common problems with travel trailer battery switches, diagnostic methods for identifying faulty switches or dead batteries, and solutions for resolving malfunctions.
We’ll walk through a systematic approach to get your power back on track.
Identifying Common Battery Switch Problems
Several issues can cause problems with your battery switch. These include a faulty switch itself (worn contacts, internal shorts), corroded connections at the battery terminals or the switch, loose wiring, blown fuses, or, of course, simply dead batteries. Sometimes, the problem isn’t the switch at all, but a faulty connection somewhere in the system. A visual inspection is the first step.
Diagnosing Battery Switch Issues
Before you start swapping parts, systematically check each component. Begin by visually inspecting the battery switch for any obvious damage, such as corrosion or loose wiring. Check the terminals on both the batteries and the switch for corrosion; clean them thoroughly if needed. Use a multimeter to test the voltage at the batteries and at the switch terminals to determine if the batteries are charged and if the voltage is reaching the switch.
A low voltage reading at the switch indicates a problem with the wiring or the switch itself. If you have a voltmeter, you can also check for continuity across the switch to ensure it’s electrically sound. A multimeter will be invaluable here. For example, if you measure 12V at the battery but only 2V at the switch, you know the problem is between the battery and the switch.
If the voltage drops significantly when you engage the switch, you may have a high-resistance connection within the switch itself.
So, you’re prepping for your awesome RV trip? First things first: understand your travel trailer’s power. Check out this guide on the battery switch on travel trailer function to avoid any dead-battery surprises. Knowing how to manage your power is key, and once you’ve got that sorted, think about insurance. Securing Aon travel insurance gives you peace of mind, letting you focus on enjoying the journey instead of worrying about unexpected issues.
It’s all about smart planning for a smooth and memorable adventure!
Resolving Common Battery Switch Malfunctions
Once you’ve identified the problem, the solution is often straightforward. Corrosion can be cleaned using a wire brush and baking soda solution. Loose wires should be tightened securely. A faulty switch usually requires replacement – this is often a simple matter of unscrewing the old switch and screwing in the new one, ensuring proper connections. If the problem is with the batteries themselves, they’ll need to be charged or replaced.
Always disconnect the negative terminal first when working with batteries to avoid accidental shorts. Remember to consult your travel trailer’s manual for specific instructions on accessing and replacing the switch. For example, if the switch is difficult to reach, you might need to remove panels or access hatches to get to it.
Troubleshooting Flowchart
This flowchart Artikels a step-by-step approach to troubleshooting your battery switch:
- Visual Inspection: Check for corrosion, loose wires, or physical damage at the switch and battery terminals.
- Voltage Test (Multimeter): Measure voltage at the battery and at the switch terminals. A significant voltage drop indicates a problem in the wiring or switch.
- Continuity Test (Multimeter): Check for continuity across the switch to confirm its electrical integrity.
- Clean Corrosion: If corrosion is present, clean the terminals with a wire brush and baking soda solution.
- Tighten Connections: Secure any loose wires.
- Replace Faulty Switch: If the switch is faulty, replace it with a new one of the same type and rating.
- Charge or Replace Batteries: If the batteries are dead, charge them or replace them as needed.
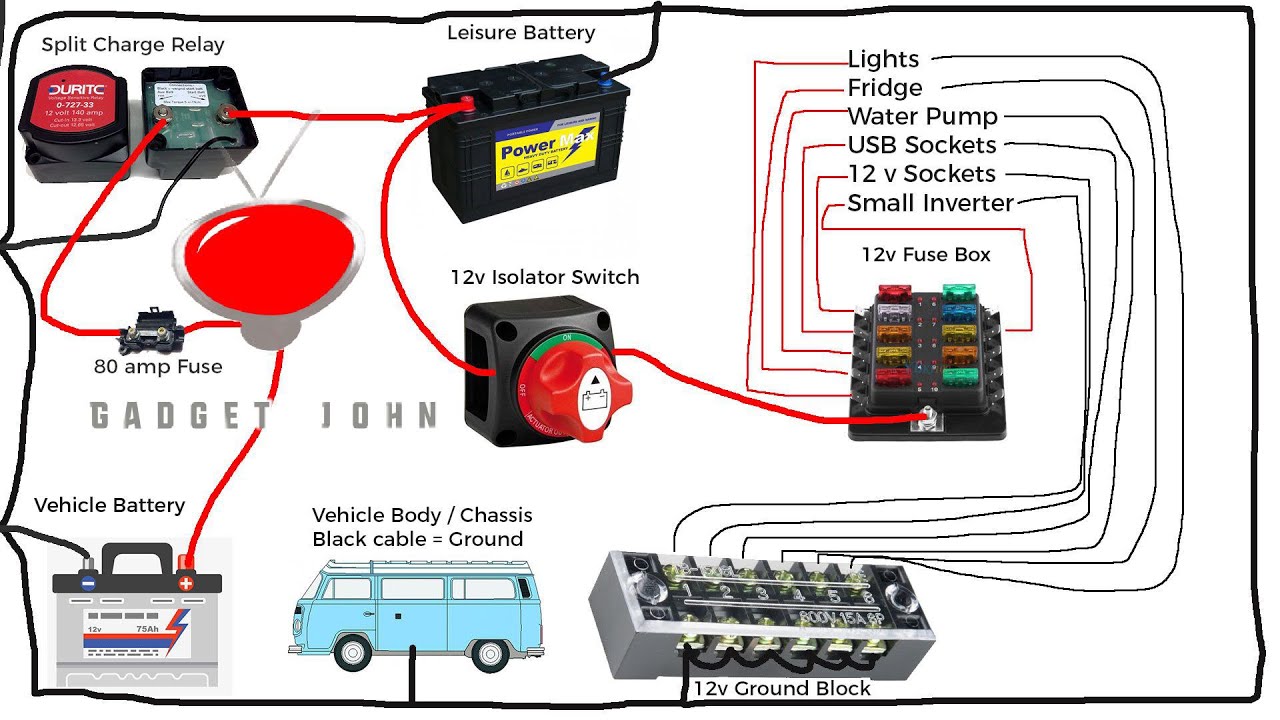
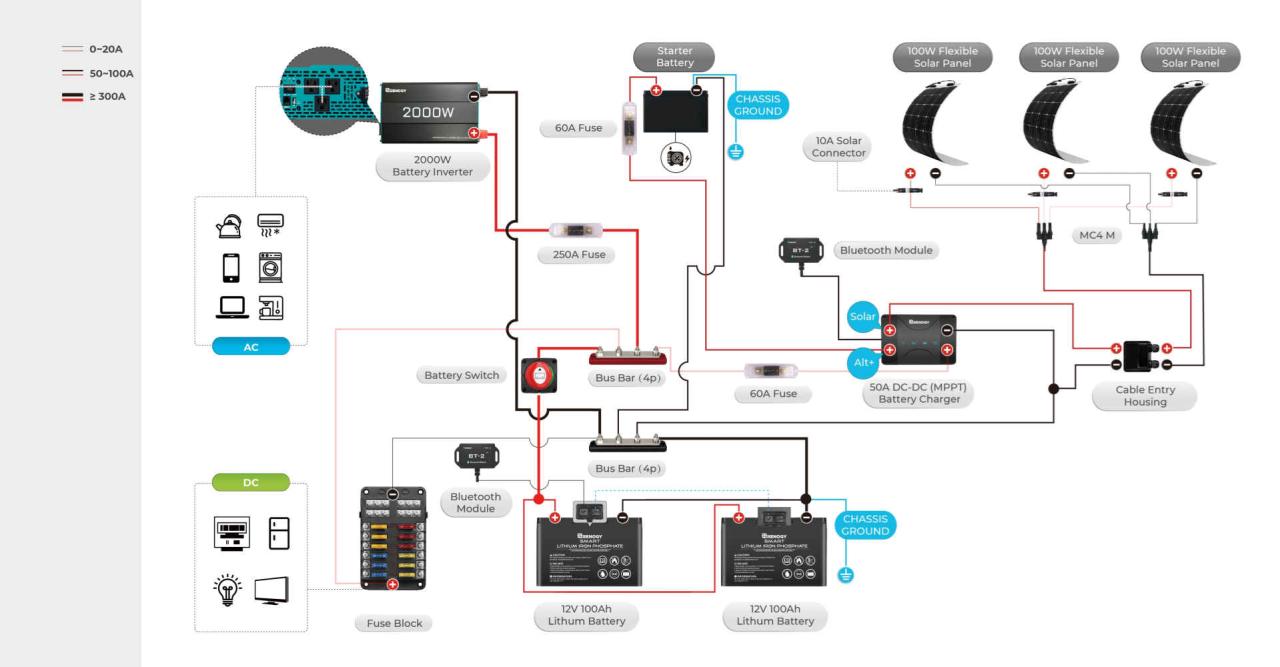
Battery Switch and Electrical System Integration
Your travel trailer’s battery switch is the central nervous system for your off-grid power. It doesn’t just turn the batteries on and off; it carefully manages the flow of power, coordinating your batteries with other crucial electrical components. Understanding its role is key to avoiding electrical problems and maximizing your power usage.The battery switch acts as a gatekeeper, controlling the power flow from your batteries to the rest of your trailer’s electrical system.
This system typically includes a converter, an inverter, and your various appliances. The converter changes 12-volt DC power from your batteries into 120-volt AC power for your household appliances. The inverter does the opposite, converting 12-volt DC power to 120-volt AC power, often used for higher-power appliances. The battery switch allows you to select which power source (shore power or batteries) feeds these components, and also allows you to disconnect the batteries entirely for safety.
So, you’re prepping for your awesome RV trip? First things first: understand your travel trailer’s power! Check out this guide on the battery switch on travel trailer function to avoid any dead-battery surprises. Knowing how to manage your power is key, and then, don’t forget to sort out your travel insurance! Getting Aon travel insurance gives you peace of mind, so you can focus on enjoying the open road.
It’s all about smart planning for a smooth and memorable adventure!
Power Distribution and Management
The battery switch’s primary function is to manage power distribution. In most setups, the switch allows you to choose between several power sources: shore power (from a campground hookup), batteries, or a combination of both. When connected to shore power, the converter typically charges your batteries while simultaneously powering your appliances. With the switch set to “battery,” your appliances are powered directly from your batteries, allowing you to use your trailer’s electrical systems even when not connected to shore power.
Selecting “off” completely disconnects the batteries from the system, preventing accidental drain and ensuring safety during storage or maintenance.
Diagram of a Typical Travel Trailer Electrical System
| Component | Description | Connection | Power Flow |
|---|---|---|---|
| Shore Power Inlet | Connects to campground power. | Connects to Converter | 120V AC |
| Converter | Changes 120V AC to 12V DC. | Connected to Battery Switch and Appliances | 12V DC to Appliances; 12V DC to Battery (charging) |
| Battery Switch | Controls power flow from batteries. | Connects to Batteries and Converter | 12V DC from Batteries to Converter or Appliances |
| Batteries | Provide DC power for appliances. | Connected to Battery Switch | 12V DC |
| Inverter | Changes 12V DC to 120V AC. | Connected to Batteries (usually via the battery switch) | 12V DC to 120V AC for Appliances |
| Appliances (Lights, Fridge, etc.) | Use 12V DC or 120V AC power. | Connected to Converter or Inverter | Receives power from Converter or Inverter |
Battery Switch Selection and Installation
Choosing and installing the right battery switch is crucial for safe and reliable power management in your travel trailer. This section will guide you through selecting a suitable switch based on your trailer’s needs and safely installing it. We’ll cover different switch types, sizing considerations, and the step-by-step installation process.
Battery Switch Types and Specifications
Several types of battery switches are available for travel trailers, each with its own advantages and disadvantages. Common types include single-pole, double-pole, and multi-pole switches. Single-pole switches control one battery bank, while double-pole switches control two, and multi-pole switches can manage more. Specifications to consider include the amperage rating (which should exceed the total amperage draw of your trailer’s system), voltage rating (typically 12V for travel trailers), and the type of switch mechanism (rotary, rocker, or push-button).
Higher amperage ratings offer more capacity for larger trailers with more power-hungry appliances. Rotary switches are commonly used due to their robust design and clear indication of the switch position.
Selecting the Appropriate Battery Switch
The selection process involves carefully assessing your trailer’s power demands. Consider the total amperage draw of all your appliances and accessories. Add a safety margin of at least 20% to account for surges and future additions. For example, if your appliances draw a total of 100 amps, a 120-amp battery switch would be appropriate. Choose a switch with a voltage rating that matches your battery system (usually 12V).
Always prioritize safety and select a switch with a higher amperage rating than your calculated needs. This ensures the switch can handle potential surges and prevents overheating.
Battery Switch Installation Steps
Installing a battery switch requires careful planning and execution. First, disconnect the negative terminal of both your house and chassis batteries. This is a critical safety precaution to prevent accidental shorts. Next, choose a suitable location for the switch, ideally within easy reach but protected from the elements. Mount the switch securely using appropriate fasteners.
Wiring involves connecting the positive (+) terminals of both batteries to the switch’s input terminals. The switch’s output terminal then connects to the positive (+) bus bar of your trailer’s electrical system. The negative (-) terminals of both batteries should be directly connected to their respective loads and chassis ground. Always use appropriately sized wiring to prevent overheating.
After wiring, carefully reconnect the negative battery terminals. Refer to the manufacturer’s instructions and wiring diagrams provided with your specific battery switch for detailed guidance. It is advisable to use a waterproof conduit to protect your wiring.
Tools and Materials Required for Battery Switch Installation, Battery switch on travel trailer function
Before starting the installation, gather the necessary tools and materials. This includes: the battery switch itself, appropriately sized wiring (gauge should match the switch’s amperage rating), a battery terminal cleaner, wire strippers and crimpers, heat-shrink tubing (for wire protection), electrical tape, appropriate fasteners and mounting hardware for the switch, a multimeter for testing connections (optional but highly recommended), and safety glasses.
Remember to always use tools and equipment appropriate for the job. Incorrect tools may damage components and compromise the safety of your installation. Always refer to the manufacturer’s instructions for specific requirements.
Mastering your travel trailer’s battery switch is a game-changer for any RVer. From understanding the different types and their functions to troubleshooting common issues and integrating solar power, this guide equips you with the knowledge to keep your RV running smoothly. Remember safety first, and always consult a professional if you’re unsure about any aspect of your electrical system.
Happy travels!
Frequently Asked Questions
What happens if I leave my battery switch on all the time?
Leaving your battery switch on constantly can drain your batteries, especially if you’re not connected to shore power. It’s best to turn it off when not using the trailer for extended periods.
How often should I check my battery switch?
Regularly inspect your battery switch for corrosion, loose connections, and any signs of damage. A visual check every few months is recommended.
Can I use a battery switch with lithium batteries?
Some battery switches are compatible with lithium batteries, but others are not. Always check the manufacturer’s specifications to ensure compatibility.
My battery switch is making a clicking noise. What’s wrong?
A clicking noise often indicates a faulty switch or low battery voltage. Check your batteries and the switch itself for any issues. If the problem persists, consult a professional.
